
I am no expert in metal jewelry making by any means, but I decided to make this necklace last year for my golden birthday. I know, I know, it's mostly silver, but that's because at the time I wasn't a huge fan of gold. Instead I decided to just be "metallic" for my golden birthday and I needed a big statement piece to go with it. I wore a silver strapless jumpsuit with a big gold, bronze, and silver beaded belt and grey shoes. This necklace fit perfectly.
Anyway, I saw this shape in a lot of necklaces last summer, but none of them were the right color so I made my own and now you can too! I still wear it all the time. I wore it in my very first outfit post over the summer and promised a tutorial. So here you go!
Golden Birthday Necklace Tutorial

Materials:

sheet metal
two different kinds of chain
two jump rings
chain nose pliers
round nose pliers
18 to 22 gauge wire in color of your choice
sand paper
nail file
pencil
Instructions:
- Use your pencil to draw out trapezoid shapes with very narrow tops in the size you want. Leave the top of your trapezoid 3/4 of an inch longer than you want it to appear on your necklace, because this is the part that will fold over to form a hole you can string onto the chain.
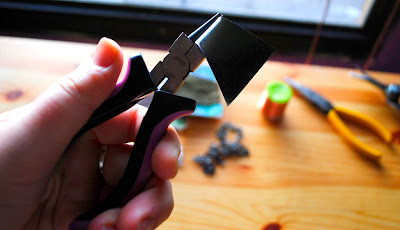
- Use your metal snips to cut out your shapes very carefully. They will be a little jagged and sharp.

- Once you have cut out all of your pieces, use the sand paper to smooth away all of the rough edges.
- Take your round nose pliers and fold over the skinny end of your trapezoid. Make sure to leave a loop big enough for your chain to fit through.
- Take the flat pliers and flatten down the back of the loop.

- Take your wire and wrap it around the top of the trapezoid making sure to wrap over the loop not inside.

- String the shapes in any order that you would like onto one length of chain. This should be only a little bit longer than the length of all of the trapezoids.
- Attach jumprings to each end of the chain and attach your second style of chain to these jump rings. I used two different kinds of chain because I really wanted the necklace to have a lot of different colors of metal in it. You can skip this step and use only one kind of chain for the whole necklace.

- Add your clasp at the end and you're all done!


Thank you!!! This is an amazing necklace! :-)
ReplyDeleteIve been trying to get my hands on some metal sheeps i have about... This tutorial would be 100% useful! Thanks Again!
Of course! I'm so happy to hear that you love it!
DeleteAwesome , that is so neandatholick I love it ,definitely going to try my hand at making one , thanx
ReplyDeletefound this looking for metal jewelry making tips and just love your blog. You did a great job esp since you claim not to be "crafty".
ReplyDeleteThanks so much! Glad to have you poking around :)
Delete